VPP Node/Feature
VPP-Node
Node 相关结构体
vlib_node_t结点的主结构,包括结点的处理功能函数,名称,结点类型等,主要保存一些相对静态信息。vlib_node_main_tNode graph相关的全局信息,Nodes 数组、vlib_next_frame_t、vlib_pending_frame_t等数据。vlib_node_registration_t注册 Node 结点时使用,保存结点业务逻辑的函数地址,结点类型,结点状态,结点名称等。vlib_node_runtime_t实际在调度 Node 过程中使用的结构,主要记录在处理过程中的信息变动。vlib_frame_t每个 Node 都有一个对应的vlib_frame_t,用来保存供 Node 使用的数据集合(标量、矢量)。vlib_next_frame_t主要是 Node 内部逻辑使用,用于定位该 Node 的下一结点所对应的 Frame 地址。vlib_pending_frame_t当一个 Node 处理完数据包,则填充该待处理帧管理表数据结,调度框架便能在下一次调度时找到需要接收该数据包的下一个Node。
Node 类型
VLIB_NODE_TYPE_INTERN : 表示处理报文的业务 Node,可在 main/worker 线程运行。
VLIB_NODE_TYPE_INPUT  : 表示为 INTERNAL 类型 Node 提供报文;收报逻辑 Node,比如 dpdk-input,可在 main/worker 线程运行。
VLIB_NODE_TYPE_PRE_INPUT : 主要是为 PROCESS 类型的 Node 提供数据,目前只有一个 epoll node,对 socket 相关逻辑提供服务,主要使用在控制业务上面,可在 main 线程运行。
VLIB_NODE_TYPE_PROCESS : 线程节点,和线程一样,可以暂停、等待、恢复时间,不同于 pthread_create,他是基于setjump/longjump实现的协程,可在 main 线程运行。
setJump 和 longJump 简单说明 ,详情参考https://www.jianshu.com/p/67592ec248f1
#include <setjump.h>
int setjump(jmp_buf env);
int sigsetjump(sigjmp_buf env,int savesigs);
非局部跳转语句— setjmp 和 longjmp 函数。非局部指的是,这不是由普通 C 语言 goto 语句在一个函数内实施的跳转,而是在栈上跳过若干调用帧,返回到当前函数调用路径上的某一个函数中。
调度方式
共分为三种状态:
VLIB_NODE_STATE_POLLING : 轮询模式
VLIB_NODE_STATE_INTERRUPT : 中断模式
VLIB_NODE_STATE_DISABLED : 如果被设置了该状态,则不会被调用
从代码上来看默认全是轮询方式。
      /* Next process input nodes. */
      vec_foreach (n, nm->nodes_by_type[VLIB_NODE_TYPE_INPUT])
    cpu_time_now = dispatch_node (vm, n,
                      VLIB_NODE_TYPE_INPUT,
                      VLIB_NODE_STATE_POLLING,
                      /* frame */ 0,
                      cpu_time_now);

///////////////////////////////////////////////////////

  last_time_stamp = dispatch_node (vm, n,
                   VLIB_NODE_TYPE_INTERNAL,
                   VLIB_NODE_STATE_POLLING,
                   f, last_time_stamp);
中断和轮询之间的切换:
模式切换依据矢量速率(累计报文数量),在vlib_main_or_worker_loop启动中设置。
当处于中断模式且矢量速率超过阈值时,切换至轮询模式。
当处于轮询模式且矢量速率低于阈值时,切换至中断模式。
这里通俗理解一下,意思就是流量大,报文密集的时候,使用轮询模式;流量小的时候,就切换到中断模式,减少cpu压力。
这个切换的原理想简单一点,还是比较容易理解的,如果当前模式为轮询状态的时候,流量突然变小了,这样就会出现cpu空转,可能转了几次才收到2、3个报文,甚至1个;这样就太浪费资源了,就切换到中断模式。
反过来想,如果当前模式是中断模式的时候,流量突然变大,cpu发生中断的那一刻,累计了报文多了,一次vector packet太多,超过阈值就要切换过来,这样就提高性能了,否则就处理不过来了。
这个说法虽然很粗糙,但是理解起来比较容易。
Node Graph相关结构体
vlib_node_main_t节点图主结构,记录全局节点图的数据信息。
vlib_node_t单个节点的主结构,包括节点的处理功能函数,名称,节点类型等,主要保存一些相对静态信息。
vlib_node_registration_t注册 Node 节点时使用,保存节点业务逻辑的函数地址,节点类型,节点状态,节点名称等。
vlib_node_runtime_t实际在调度 Node 过程中使用的结构,主要记录在处理过程中的信息变动。
vlib_frame_t保存每个 Node 对应的要处理的数据的内存地址信息。
vlib_pending_frame_t记录运行节点的索引,数据包索引,以及下一个数据包的索引。
vlib_next_frame_t主要用于获取 Node 要处理的下一条数据。
VLIB_NODE_TYPE_INPUT节点类型
INPUT类型节点一般运行在 worker 线程,也可以配置在 main 线程里面运行。
调用流程在 vlib_main_or_worker_loop 函数的 while(1) 循环里面;简单去想,就是收报文用的。
/* Next process input nodes. */
vec_foreach (n, nm->nodes_by_type[VLIB_NODE_TYPE_INPUT])
cpu_time_now = dispatch_node (vm, n,
               VLIB_NODE_TYPE_INPUT,
               VLIB_NODE_STATE_POLLING,
               /* frame */ 0,
               cpu_time_now);
VLIB_NODE_TYPE_INTERNAL 节点类型
简单的说就是处理报文的。
这个我们可以通过分析 INPUT 类型的 Node 是如何把报文发送给 INTERNAL 类型的 Node 的整个过程来理解,具体步骤分为以下几步:
1.确定把报文发送给第几个 Next 节点,怎么解释这一步?
把报文送给哪个 Next 节点处理,是由该 Node 的业务逻辑决定的,通常有两种方式:
一是通过解析报文的内容来决定,比如
ethernet-input节点通过解析报文是 ipv4 还是 ipv6 报文把报文发送给ip4-input或ip6-input去处理;二是通过查找转发表来决定,比如
ip4-lookup通过查找路由表来决定把报文发送给ip4-arp还是ip4-rewrite节点来处理。
2.找到该 Next 节点对应的用于存放报文的结构 vlib_frame_t(保存每个 Node 对应的要处理数据的内存地址信息),根据 Node 图的初始化流程可知,确定把报文发送给第几个 Next 节点之后,就可以获取该 Next 节点对应的 vlib_next_frame_t (主要用于获取node要处理的下一条数据) 结构了。vlib_next_frame_t 结构中的frame_index 字段指向 vlib_frame_t 结构,vlib_frame_t 结构是存放报文索引的地方(也就 vlib_buffer_t 结构索引)。
3.把报文放入 vlib_frame_t 结构,vlib_frame_t 结构最后一个字段(u8 arguments[0])为可变数组,初始化的时候会分配一块内存,用于存放报文的索引。
4.创建 vlib_pending_frame_t 结构,并把它加入动态数组 vm->node_main. pending_frames 等待调度,vlib_pending_frame_t 结构记录报文所在的结构 vlib_next_frame_t 的 索引,以及处理这些报文的 Node 的 vlib_node_runtime_t 结构的索引,这样通过 vlib_pending_frame_t 结构里面的信息就可以把报文分发给指定的 Node 处理了。
我们看一段 test_proc 的部分代码
always_inline uword test_proc(vlib_main_t *vm, vlib_node_runtime_t *node,
                             vlib_frame_t *frame, u32 is_ip4)
{
    u16 next_node[VLIB_FRAME_SIZE];
    u32 buf_out[VLIB_FRAME_SIZE];
    u32 nums = 0;
    u32 n_left_from = 0;
    u32 *from = NULL;
    from = vlib_frame_vector_args(frame);
    n_left_from = frame->n_vectors;
    //    clib_warning("n_left_from %u",n_left_from);
    while (n_left_from > 0)
    {
        if (is_ip4)
        {
            next_node[nums] = ipv4_statistics(vm, from[0]);
        }
        else
        {
            next_node[nums] = ipv6_statistics(vm, from[0]);
        }
        buf_out[nums] = from[0];
        nums++;
        from += 1;
        n_left_from -= 1;
    }
    if (nums > 0)
    {//这个函数是重点,就是完成了上面描述的2-4的流程
        vlib_buffer_enqueue_to_next(vm, node, buf_out, next_node, nums);
    }
    return (nums);
}
vlib_buffer_enqueue_to_next 该函数里面重要的两个调用,一个是宏 vlib_get_next_frame ,一个是函数 vlib_put_next_frame;其他都是以下计算偏移代码和赋值代码,并且都支持指令集优化。
vlib_get_next_frame功能是:找到该 Next 节点对应的用于存放报文的结构vlib_frame_t,返回 :to_next:返回当前要存放报文索引位置;n_left_to_next:存放to_next报文空间大小。函数
vlib_put_next_frame,先将报文加入数组vm->vlib_node_main_t.pending_frames等待调度处理。
static_always_inline void
vlib_buffer_enqueue_to_next (vlib_main_t * vm, vlib_node_runtime_t * node,
                 u32 * buffers, u16 * nexts, uword count)
{
  u32 *to_next, n_left_to_next, max;
  u16 next_index;

  next_index = nexts[0];
  vlib_get_next_frame (vm, node, next_index, to_next, n_left_to_next);
  max = clib_min (n_left_to_next, count);

  while (count)
    {
      u32 n_enqueued;
      if ((nexts[0] != next_index) || n_left_to_next == 0)
    {
      vlib_put_next_frame (vm, node, next_index, n_left_to_next);
      next_index = nexts[0];
      vlib_get_next_frame (vm, node, next_index, to_next, n_left_to_next);
      max = clib_min (n_left_to_next, count);
    }
     //这里的宏定义时判断支持那种指令集优化,主要时针对向量指令集
#if defined(CLIB_HAVE_VEC512)
      u16x32 next32 = CLIB_MEM_OVERFLOW_LOAD (u16x32_load_unaligned, nexts);
      next32 = (next32 == u16x32_splat (next32[0]));
      u64 bitmap = u16x32_msb_mask (next32);
      n_enqueued = count_trailing_zeros (~bitmap);
#elif defined(CLIB_HAVE_VEC256)
      u16x16 next16 = CLIB_MEM_OVERFLOW_LOAD (u16x16_load_unaligned, nexts);
      next16 = (next16 == u16x16_splat (next16[0]));
      u64 bitmap = u8x32_msb_mask ((u8x32) next16);
      n_enqueued = count_trailing_zeros (~bitmap) / 2;
#elif defined(CLIB_HAVE_VEC128) && defined(CLIB_HAVE_VEC128_MSB_MASK)
      u16x8 next8 = CLIB_MEM_OVERFLOW_LOAD (u16x8_load_unaligned, nexts);
      next8 = (next8 == u16x8_splat (next8[0]));
      u64 bitmap = u8x16_msb_mask ((u8x16) next8);
      n_enqueued = count_trailing_zeros (~bitmap) / 2;
#else
      u16 x = 0;
      if (count + 3 < max)
    {
      x |= next_index ^ nexts[1];
      x |= next_index ^ nexts[2];
      x |= next_index ^ nexts[3];
      n_enqueued = (x == 0) ? 4 : 1;
    }
      else
    n_enqueued = 1;
#endif

      if (PREDICT_FALSE (n_enqueued > max))
    n_enqueued = max;

#ifdef CLIB_HAVE_VEC512
      if (n_enqueued >= 32)
    {
      vlib_buffer_copy_indices (to_next, buffers, 32);
      nexts += 32;
      to_next += 32;
      buffers += 32;
      n_left_to_next -= 32;
      count -= 32;
      max -= 32;
      continue;
    }
#endif

#ifdef CLIB_HAVE_VEC256
      if (n_enqueued >= 16)
    {
      vlib_buffer_copy_indices (to_next, buffers, 16);
      nexts += 16;
      to_next += 16;
      buffers += 16;
      n_left_to_next -= 16;
      count -= 16;
      max -= 16;
      continue;
    }
#endif

#ifdef CLIB_HAVE_VEC128
      if (n_enqueued >= 8)
    {
      vlib_buffer_copy_indices (to_next, buffers, 8);
      nexts += 8;
      to_next += 8;
      buffers += 8;
      n_left_to_next -= 8;
      count -= 8;
      max -= 8;
      continue;
    }
#endif

      if (n_enqueued >= 4)
    {
      vlib_buffer_copy_indices (to_next, buffers, 4);
      nexts += 4;
      to_next += 4;
      buffers += 4;
      n_left_to_next -= 4;
      count -= 4;
      max -= 4;
      continue;
    }

      /* copy */
      to_next[0] = buffers[0];

      /* next */
      nexts += 1;
      to_next += 1;
      buffers += 1;
      n_left_to_next -= 1;
      count -= 1;
      max -= 1;
    }
  vlib_put_next_frame (vm, node, next_index, n_left_to_next);
}
注册节点
VPP 提供了一套通用的注册节点方法。具体实现如下:
VLIB_NODE_FN(xxx_v4)
(vlib_main_t *vm, vlib_node_runtime_t *node, vlib_frame_t *frame)
{
    return xxx_proc(vm, node, frame, 1);
}

VLIB_NODE_FN(xxx_v6)
(vlib_main_t *vm, vlib_node_runtime_t *node, vlib_frame_t *frame)
{
    return xxx_proc(vm, node, frame, 0);
}

/* *INDENT-OFF* */
#ifndef CLIB_MARCH_VARIANT
VLIB_REGISTER_NODE(xxx_v4) = {
    .name = "hds-v4",
    .vector_size = sizeof(u32),
    .format_trace = format_hds_trace,
    .type = VLIB_NODE_TYPE_INTERNAL,

    .n_errors = ARRAY_LEN(hds_error_strings),
    .error_strings = xxx_error_strings,

    .n_next_nodes = XXX_N_NEXT,

    /* edit / add dispositions here */
    .next_nodes =
        {
            [XXX_NEXT_DROP] = "error-drop",
            [XXX_NEXT_IP4_LOOKUP] = "ip4-lookup",
            [XXX_NEXT_IP6_LOOKUP] = "ip6-lookup",
        },
};
#endif /* CLIB_MARCH_VARIANT */
/* *INDENT-ON* */

/* *INDENT-OFF* */
#ifndef CLIB_MARCH_VARIANT
VLIB_REGISTER_NODE(xxx_v6) = {
    .name = "xxx-v6",
    .vector_size = sizeof(u32),
    .format_trace = format_hds_trace,
    .type = VLIB_NODE_TYPE_INTERNAL,

    .n_errors = ARRAY_LEN(hds_error_strings),
    .error_strings = xxx_error_strings,

    .n_next_nodes = XXX_N_NEXT,

    /* edit / add dispositions here */
    .next_nodes =
        {
            [XXX_NEXT_DROP] = "error-drop",
            [XXX_NEXT_IP4_LOOKUP] = "ip4-lookup",
            [XXX_NEXT_IP6_LOOKUP] = "ip6-lookup",
        },
};
#endif /* CLIB_MARCH_VARIANT */
VPP-Feature
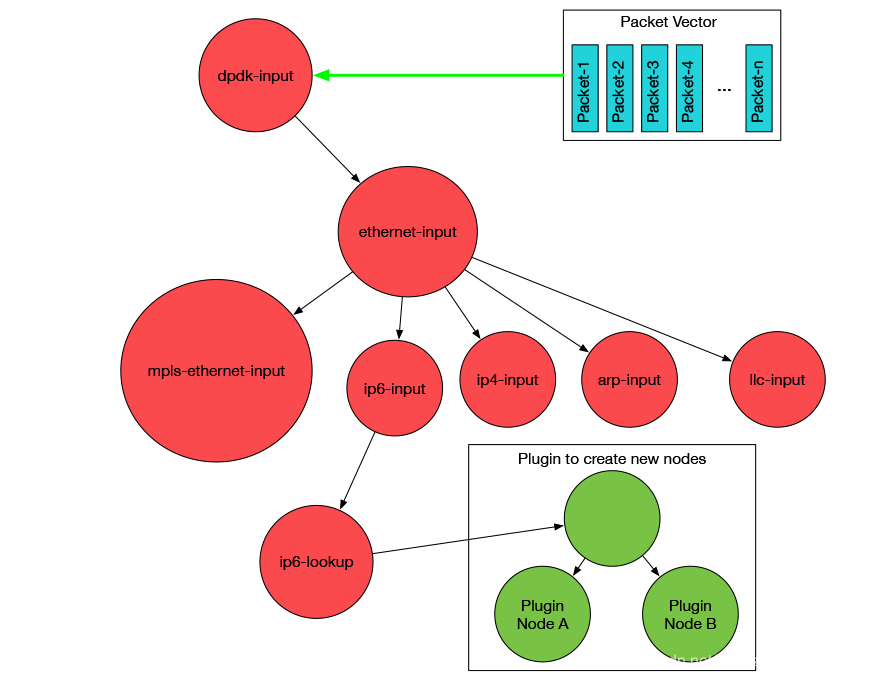
VPP 内部业务逻辑是通过一系列的 Node 连接来实现的,这些 Node 通常在初始化时定义好,比如二层以太处理 ethernet-input,三层 ip4-input 等,通过初始化定义,将 Node 连接成一个有序的向量图,来实现 VPP 的业务功能。
而早期的 VPP 本身的 Node 框架比较固定,各个 Node 之间逻辑连接已经固定了。为此新版本增加了 Feature 机制,每个 Feature 是一个 Node,用户可以启用/停止某个或某些 Feature。用户也可以自己写插件,把自定义 Node(自己的业务逻辑)加入到指定位置。
VPP 中,将不同的 Feature 按照类型分成了不同的组,每组 Feature 称之为一个 Arc。Arc中的 Feature 按照代码指定的顺序串接起来。 Arc 结构中,记录这组 Feature 中的起始 Node 和结束 Node。系统初始化时,会完成初步的排序,但并没有应用到对应的接口中。
初始化
VNET_FEATURE_ARC_INIT 宏用来注册 vnet_feature_arc_registration_t 类型的 Arc,将其注册到 vnet_feature_main_t 类型的全局变量feature_main。每个 Arc 包含一组 Feature。
源码分析举例:
src/vnet/ip/ip4_forward.c:
VNET_FEATURE_ARC_INIT 宏进行注册 Arc
/* Built-in ip4 unicast rx feature path definition */
/* *INDENT-OFF* */
VNET_FEATURE_ARC_INIT (ip4_unicast, static) =
{
  .arc_name = "ip4-unicast",
    //这两个实际上在运行时只会有一个,通过配置指定运行哪一个node;一个计算ip校验和,一个不计算
  .start_nodes = VNET_FEATURES ("ip4-input", "ip4-input-no-checksum"),
  .last_in_arc = "ip4-lookup",
  .arc_index_ptr = &ip4_main.lookup_main.ucast_feature_arc_index,
};
VNET_FEATURE_ARC_INIT 宏展开
static vnet_feature_arc_registration_t vnet_feat_arc_ip4_unicast = {
  .arc_name = "ip4-unicast",
  .start_nodes = (char*[]) { "ip4-input", "ip4-input-no-checksum", 0},
  .last_in_arc = "ip4-lookup",
  .arc_index_ptr = &ip4_main.lookup_main.ucast_feature_arc_index,
};
/*__attribute__((constructor))在main函数之前,执行一个函数*/
static void __vnet_add_feature_arc_registration_ip4_unicast(void) __attribute__((__constructor__));
static void __vnet_add_feature_arc_registration_ip4_unicast(void)
{
    vnet_feature_main_t *fm = &feature_main;
    vnet_feat_arc_ip4_unicast.next = fm->next_arc;
    fm->next_arc = &vnet_feat_arc_ip4_unicast;
}
/*__attribute__((__destructor__)) 系统在main()函数退出或者调用了exit()之后,调用的函数*/
static void __vnet_rm_feature_arc_registration_ip4_unicast(void) __attribute__((__destructor__));
static void __vnet_rm_feature_arc_registration_ip4_unicast(void)
{
    vnet_feature_main_t *fm = &feature_main;
    vnet_feature_arc_registration_t *r = &vnet_feat_arc_ip4_unicast;
    {
        ASSERT(fm->next_arc);
        if (fm->next_arc == r)
            fm->next_arc = (r)->next;
        else
        {
            __typeof__(r) current = fm->next_arc;
            while (current->next)
            {
                if (current->next == r)
                {
                    current->next = current->next->next;
                    break;
                }
                current = current->next;
            }
            ASSERT(current);
        }
    }
}
Arc 类型:
每种 Arc 都对应了不同的一组功能,常用的如ip4-unicast(处理 IPv4 报文单播)、ip4-local(处理目的为自己的 IPv4 报文)、ip4-punt(处理 IPv4 本地上送报文)等。
添加 Feature 到指定的 Arc 里面
VNET_FEATURE_INIT 宏用来注册 vnet_feature_registration_t 类型的 Feature,将其注册到 vnet_feature_main_t 类型的全局变量 feature_main。
VNET_FEATURE_INIT 宏注册 Feature
/* *INDENT-OFF* */
VNET_FEATURE_INIT(xxx_v4, static) =
    {
        .arc_name = "ip4-unicast",
        .node_name = "xxx-v4",
        .runs_before = VNET_FEATURES("ip4-lookup"),
};
VNET_FEATURE_INIT 宏展开
static vnet_feature_registration_t vnet_feat_xxx_v4 =
    {
        .arc_name = "ip4-unicast",
        .node_name = "xxx-v4",
        .runs_before = VNET_FEATURES("ip4-lookup"),
};
static void __vnet_add_feature_registration_xxx_v4(void) __attribute__((__constructor__));
static void __vnet_add_feature_registration_xxx_v4(void)
{
    vnet_feature_main_t *fm = &feature_main;
    vnet_feat_xxx_v4.next = fm->next_feature;
    fm->next_feature = &vnet_feat_xxx_v4;
}
static void __vnet_rm_feature_registration_xxx_v4(void) __attribute__((__destructor__));
static void __vnet_rm_feature_registration_xxx_v4(void)
{
    vnet_feature_main_t *fm = &feature_main;
    vnet_feature_registration_t *r = &vnet_feat_xxx_v4;
    {
        ASSERT(fm->next_feature);
        if (fm->next_feature == r)
            fm->next_feature = (r)->next;
        else
        {
            __typeof__(r) current = fm->next_feature;
            while (current->next)
            {
                if (current->next == r)
                {
                    current->next = current->next->next;
                    break;
                }
                current = current->next;
            }
            ASSERT(current);
        }
    }
}
vnet_feature_enable_disable
该函数就是将某个 Feature 开启或关闭
我们可以通过实现命令行调用这个函数来实现启动和关闭
vnet_feature_enable_disable("ip4-unicast", "xxx-v4", sw_if_index, enable_disable, 0, 0);
vnet_feature_enable_disable("ip6-unicast", "xxx-v6", sw_if_index, enable_disable, 0, 0);
vnet_feature_arc_start
该函数主要由 Arc 内的 start node 调用,在 start node 中通过该函数,进入到已经组织好的 Feature 的 Node 的矢量图中。
比如在 ipv4-unicast 这个 Arc 中,其 start node 之一是 ip4-input,那么在 ip4-input 的处理函数中,将会调用此函数进入到 Feature 的 Node 矢量图中。
总结
这篇我们主要是理解 Node、Feature、Arc 的三者的关系,搞清楚这个了,我们就能灵活的添加自己的业务在 VPP 里面了。