Bypass wd代码设计文档
命令行框架设计
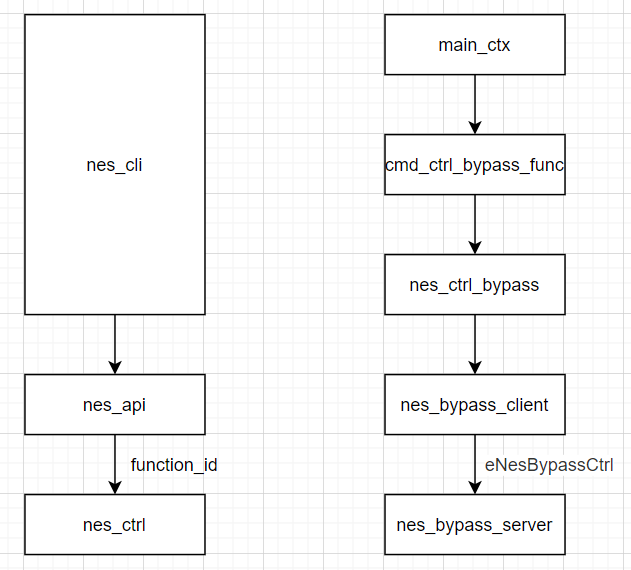
main_ctx、cmd_ctrl_bypass_func、nes_ctrl_bypass属于nes_cli模块,负责进行命令的下发;nes_bypass_client属于nes_api模块,负责进行命令数据的传递;nes_bypass_server属于nes_ctrl模块,通过function_id(这里是eNesBypassCtrl),接收下发的数据,解析后调用Bypass相关接口,进行Bypass控制。
nes_cli模块
typedef struct cmd_ctrl_bypass_ctrl_result {
    cmdline_fixed_string_t bypass_ctrl;
    char bypass_data_string[NES_MAX_LOOKUP_ENTRY_LEN];
} cmd_ctrl_bypass_ctrl_result;

cmdline_parse_token_string_t cmd_ctrl_bypass =
    TOKEN_STRING_INITIALIZER(struct cmd_ctrl_bypass_ctrl_result, bypass_ctrl, "bypass-ctrl");

cmdline_parse_token_string_t cmd_ctrl_bypass_data_string =
    TOKEN_STRING_INITIALIZER(struct cmd_ctrl_bypass_ctrl_result, bypass_data_string, NULL);

static void
nes_ctrl_bypass(void *parsed_result,
    __attribute__((unused)) struct cmdline *nes_cmdline, __attribute__((unused)) void *data) {
    struct cmd_ctrl_bypass_ctrl_result *res = parsed_result;

    if (NES_SUCCESS != nes_bypass_client(&remote_NEV, res->bypass_data_string))
        cmdline_printf(nes_cmdline, "Bypass ctrl fail!\n");
    else
        cmdline_printf(nes_cmdline, "Bypass ctrl success!\n");
}

cmdline_parse_inst_t cmd_ctrl_bypass_func = {
    .f = nes_ctrl_bypass,
    .data = NULL,
    .help_str = "Bypass ctrl",
    .tokens =
    {
        (void *) &cmd_ctrl_bypass,
        (void *) &cmd_ctrl_bypass_data_string,
        NULL,
    },
};
该命令行共由两个参数组成,第一个参数为命令提示符bypass-ctrl,第二个参数为字符串bypass_data_string,以特定的组合下发Bypass具体命令,组合方式如下:
device:xxx,command:xxx,parameter:xxx
device可设置为特定端口的pci地址,也可设置为all,表示要设置所有的Bypass网卡,command表示要设置的具体功能,若该功能需要一些参数指标,可以通过parameter来指定,所以最少要设置device和command这两个选项,具体命令可以参照附录。
nes_api模块
struct bypass_ctrl {
    char bypass_data_string[NES_MAX_LOOKUP_ENTRY_LEN];
} *data;

nes_api_msg_t *api_msg = NULL;
nes_api_msg_t *api_response = NULL;
int ret;
uint16_t data_len = sizeof(struct bypass_ctrl);

api_msg = malloc(sizeof(nes_api_msg_t) + data_len);
VERIFY_PTR_OR_RET(api_msg, NES_FAIL);
api_msg->message_type = eRequest;
api_msg->function_id = eNesBypassCtrl;
data = (struct bypass_ctrl *)api_msg->data;

memcpy(data->bypass_data_string, bypass_data_string, NES_MAX_LOOKUP_ENTRY_LEN);

api_msg->data_size = data_len;

if (NES_SUCCESS != nes_send_api_msg(self, api_msg, &api_response)) {
    free(api_msg);
    return NES_FAIL;
}
nes_bypass_client函数将Bypass的命令数据通过api_msg传递下去,function_id为eNesBypassCtrl,接收端也通过这个标识来接收。
nes_ctrl模块
for (i = 0; i < lookup_entries; i++) {
    if (strcmp("device", cfg_lookup_entries[i].name) == 0) {
        bypass_parameter_list[0] = cfg_lookup_entries[i].value;
    }
    else if (strcmp("command", cfg_lookup_entries[i].name) == 0) {
        bypass_parameter_list[1] = cfg_lookup_entries[i].value;
    } else if (strcmp("parameter", cfg_lookup_entries[i].name) == 0) {
        bypass_parameter_list[2] = cfg_lookup_entries[i].value;
    }
    else {
        NES_LOG(ERR, "Not expected name %s\n", cfg_lookup_entries[i].name);
        response->message_type = eError;
        response->data_size = 0;
        return response;
    }
}

if (bypass_parameter_list[0] == NULL || bypass_parameter_list[1] == NULL) {
    NES_LOG(ERR, "Insufficient name expected\n");
    response->message_type = eError;
    response->data_size = 0;
    return response;
}

if (NES_SUCCESS != parse(lookup_entries, bypass_parameter_list)) {
    response->message_type = eError;
    response->data_size = 0;
    return response;
}
定义指针数组bypass_parameter_list,保存根据预定义格式解析出的字符串地址,将参数个数lookup_entries和该数组传入parse函数,进行Bypass设置,比如设置看门狗的超时时间。
喂狗实现
    for (;;) {
        for (i = 1; i <= lcores_count; i++) {
            enum rte_lcore_state_t state = rte_eal_get_lcore_state(i);
            if (state != RUNNING) {
                    NES_LOG(INFO, "Lcore %d stopped\n", i);
                    if (NES_SUCCESS != is_avp_enabled()) {
                        const char *dev_basename;
                        if (NES_SUCCESS == nes_cfgfile_entry("VM common",
                                "vhost-dev", &dev_basename)) {
                            rte_vhost_driver_unregister(dev_basename);
                        }
                        if (NES_SUCCESS == nes_cfgfile_has_section("KNI")) {
                            nes_dev_kni_stop();
                        }
                    }
                    nes_cfgfile_close();
                    nes_routefile_close();
                    return rte_eal_wait_lcore(i);
            }
        }

        nes_bypass_reset_wd();

        rte_pause();
    }
在nes_main中会轮询调用nes_bypass_reset_wd函数进行喂狗检测,在用命令行设置过看门狗超时时间后,相关状态会被置位,该函数检测到后就会进行相关端口的喂狗动作。
喂狗检测数据结构
enum wd_switch{
    wd_init = 0,
    wd_off,
    wd_on
}; /* 标识Bypass网卡wd状态 */

typedef struct single_port_flag {
    int bus;
    int slot;
    int func;
    unsigned char flag; /* 标识单端口wd状态,未设置为wd_init,开启为wd_on,关闭为wd_off */
} single_port_flag;

 typedef struct all_port_flag {
    single_port_flag bypass_wd_single[MAX_BYPASS_PORT];
    unsigned char flag; /* 标识所有端口wd状态,未设置为wd_init,全部开启为wd_on,
                           部分开启为wd_off */
} all_port_flag;

all_port_flag bypass_wd_all;
single_port_flag是单端口的一个结构体,除了标志位还有pci地址的标识,all_port_flag是所有端口的一个结构体,MAX_BYPASS_PORT设置为5,最多能标识5块Bypass卡。
喂狗检测逻辑
    if (bypass_wd_all.flag == wd_init) {
        return ;
    }
    else if (bypass_wd_all.flag == wd_on) {
        bypass_parameter_num = BYPASS_MIN_INPUT_COUNT;
        bypass_parameter_list[0] = "all";
        bypass_parameter_list[1] = "reset_bypass_wd";
        bypass_parameter_list[2] = NULL;
        if (parse(bypass_parameter_num, bypass_parameter_list))
        {
            NES_LOG(ERR, "FAILED to reset_all_bypass_wd\n");
        }

        return ;
    } else {
        for (i = 0; i < MAX_BYPASS_PORT; i++) {
            if (bypass_wd_all.bypass_wd_single[i].flag != wd_on) {
                continue ;
            }
            bypass_parameter_num = BYPASS_MIN_INPUT_COUNT;
            snprintf(device_name, BYPASS_MAX_DEVICE_NAME_LEN, "%x:%x.%d", bypass_wd_all.bypass_wd_single[i].bus,
                bypass_wd_all.bypass_wd_single[i].slot, bypass_wd_all.bypass_wd_single[i].func);
            bypass_parameter_list[0] = device_name;
            bypass_parameter_list[1] = "reset_bypass_wd";
            bypass_parameter_list[2] = NULL;

            if (parse(bypass_parameter_num, bypass_parameter_list))
            {
                NES_LOG(ERR, "FAILED to reset_all_bypass_wd\n");
            }
        }

        return ;
    }
这是nes_bypass_reset_wd函数中的内容,当检测所有端口的状态为init时,不喂狗;当为on时,设置全部喂狗;当为其它状态时,去检测具体端口的喂狗开关,当打开时,去给指定的端口喂狗。
设置状态位的方法
在命令行配置看门狗超时时间的同时,进行状态位的更改,因为命令行配置有两种方法,即一次配置全部端口和配置某个端口,所以这里也有两种情况。
设置所有端口
    for (i = 0; i < dev_num; i++) {
        bpctl_cmd.in_param[0] = i;
        ret_val = ioctl(file_desc, IOCTL_TX_MSG(SET_BYPASS_WD), &bpctl_cmd);
        if (ret_val == 0) {
            if (if_info_msg(file_desc, &bpctl_cmd) == 0) {
                continue;
            }

            if (bpctl_cmd.status < 0) {
                printf("fail\n");
                return ERROR;
            } else if (bpctl_cmd.status == 0) {
                set_bypass_port_flag(bpctl_cmd.out_param[0], bpctl_cmd.out_param[1], bpctl_cmd.out_param[2], wd_off);
                printf("disable\n");
            } else {
                set_bypass_port_flag(bpctl_cmd.out_param[0], bpctl_cmd.out_param[1], bpctl_cmd.out_param[2], wd_on);
                all_port_flag++;
                printf("%d\n", bpctl_cmd.status);
            }
        }
    }

    if (dev_num == all_port_flag) {
        bypass_wd_all.flag = wd_on;
    } else if(0 == all_port_flag) {
        bypass_wd_all.flag = wd_init;
    } else {
        bypass_wd_all.flag = wd_off;
    }
dev_num是检测出的Bypass网卡数量,若all_port_flag的数量与dev_num相等,则将所有端口都置为on;若没有一个端口置为on,即all_port_flag为0,则还置为init;其它情况下置为off。
设置单端口
if ((ret_val == 0) && (bpctl_cmd.status >= 0)) {

    if (!bpctl_cmd.status) {
        set_bypass_port_flag(bus, slot, func, wd_off);
        for (i = 0; i < MAX_BYPASS_PORT; i++) {
            if (bypass_wd_all.bypass_wd_single[i].flag == wd_on) {
                bypass_wd_all.flag = wd_off;
                break;
            }
        }
        if (bypass_wd_all.flag != wd_off) {
            bypass_wd_all.flag = wd_init;
        }
        printf(WD_DIS_MSG);
    }
    else if (bpctl_cmd.status > 0) {
        if (bypass_wd_all.flag != wd_on) {
            bypass_wd_all.flag = wd_off;
            set_bypass_port_flag(bus, slot, func, wd_on);
        }
        printf(WDT_STATE_MSG, bpctl_cmd.status);
    }
} else {
    printf(NOT_SUPP_SLAVE_MSG);
    return ERROR;
}
将某个端口置为off时,先去做单端口的标记,然后检测所有端口是否有on的情况,若有,就将bypass_wd_all.flag置为off,若无就置为init,这样检测喂狗时就节省了时间;将某个端口置为on时,若检测到所有的端口都为on,就不做这样的重复操作,还进行全员喂狗,同时还节省了喂狗检测时间,其它情况将bypass_wd_all.flag置为off,指定端口置为on。
set_bypass_port_flag函数逻辑
    for (i = 0; i < MAX_BYPASS_PORT; i++) {
        if (bypass_wd_all.bypass_wd_single[i].flag == wd_init) {
            continue ;
        }
        if (bypass_wd_all.bypass_wd_single[i].bus == bus &&
            bypass_wd_all.bypass_wd_single[i].slot == slot &&
            bypass_wd_all.bypass_wd_single[i].func == func) {
            bypass_wd_all.bypass_wd_single[i].flag = flag;
            break ;
        }
    }

    if (MAX_BYPASS_PORT == i) {
        for (j = 0; j < MAX_BYPASS_PORT; j++) {
            if (bypass_wd_all.bypass_wd_single[j].flag != wd_on) {
                bypass_wd_all.bypass_wd_single[j].bus = bus;
                bypass_wd_all.bypass_wd_single[j].slot = slot;
                bypass_wd_all.bypass_wd_single[j].func = func;
                bypass_wd_all.bypass_wd_single[j].flag = flag;
                break ;
            }
        }
    }
先检测是否已经存放了这个pci地址,若已经存放,更改这个pci的状态,这是为了防止出现两个节点的pci地址一样;若不存在,则将第一个非on节点设置为这个pci地址,同时置传入的状态。
问题思考
目前喂狗功能是在nes_main这个主线程中调用,因为只有一块Bypass卡,所以喂狗操作最多下一条命令,不会对其它功能造成什么影响;但当后续需要增加Bypass卡时,就要看这里喂狗产生的时延会不会影响其它功能,若有影响就要考虑增加线程单独来进行喂狗操作;目前代码中最多支持对5块Bypass网卡进行喂狗,若后续有更多的需求,可考虑改为从配置文件读取或者使用命令行进行修改支持的网卡上限。
附录
目前合入的功能有:set_bypass/get_bypass、set_bypass_pwoff/get_bypass_pwoff、set_bypass_pwup/get_bypass_pwup、set_wd_exp_mode/get_wd_exp_mode和set_bypass_wd/get_bypass_wd,下面是配置示例,device可以配置为all或者端口pci地址:
set_bypass/get_bypass

bypass-ctrl device:all,command:set_bypass,parameter:on

bypass-ctrl device:all,command:set_bypass,parameter:off

bypass-ctrl device:all,command:get_bypass

bypass-ctrl device:00:0a.0,command:set_bypass,parameter:on

bypass-ctrl device:00:0a.0,command:set_bypass,parameter:off

bypass-ctrl device:00:0a.0,command:get_bypass


set_bypass_pwoff/get_bypass_pwoff

bypass-ctrl device:all,command:set_bypass_pwoff,parameter:on

bypass-ctrl device:all,command:set_bypass_pwoff,parameter:off

bypass-ctrl device:all,command:get_bypass_pwoff

bypass-ctrl device:00:0a.0,command:set_bypass_pwoff,parameter:on

bypass-ctrl device:00:0a.0,command:set_bypass_pwoff,parameter:off

bypass-ctrl device:00:0a.0,command:get_bypass_pwoff


set_bypass_pwup/get_bypass_pwup

bypass-ctrl device:all,command:set_bypass_pwup,parameter:on

bypass-ctrl device:all,command:set_bypass_pwup,parameter:off

bypass-ctrl device:all,command:get_bypass_pwup

bypass-ctrl device:00:0a.0,command:set_bypass_pwup,parameter:on

bypass-ctrl device:00:0a.0,command:set_bypass_pwup,parameter:off

bypass-ctrl device:00:0a.0,command:get_bypass_pwup


set_wd_exp_mode/get_wd_exp_mode

bypass-ctrl device:all,command:set_wd_exp_mode,parameter:bypass

bypass-ctrl device:all,command:get_wd_exp_mode

bypass-ctrl device:00:0a.0,command:set_wd_exp_mode,parameter:bypass

bypass-ctrl device:00:0a.0,command:get_wd_exp_mode


set_bypass_wd/get_bypass_wd

bypass-ctrl device:all,command:set_bypass_wd,parameter:1000

bypass-ctrl device:all,command:set_bypass_wd,parameter:0

bypass-ctrl device:all,command:set_bypass_wd,parameter:0ff

bypass-ctrl device:all,command:get_bypass_wd

bypass-ctrl device:00:0a.0,command:set_bypass_wd,parameter:1000

bypass-ctrl device:00:0a.0,command:set_bypass_wd,parameter:0

bypass-ctrl device:00:0a.0,command:set_bypass_wd,parameter:0ff

bypass-ctrl device:00:0a.0,command:get_bypass_wd